Sunday, August 9, 2015

Back On Her Feet and Onto the Trailer

We turned the boat back over and held the Unflippin' Party yesterday evening (August 8).  This job turned out to be much harder than expected, compared to turning it over the other way.  Here are some photos that tell the story:
That thing looks heavy.  Can we do this?

Maybe we can roll it over here--the driveway's pretty steep though.

Well, maybe this wasn't such a good idea after all.

Back down she goes.

On the way out to the street where it's level and there's more room to maneuver.
Set her down easy.

Half-way over.

And she's almost upright at last.

Keel is on the trailer!

Just about there.

And she's on--huge sigh of relief!

Back in the garage.
I decided to put the boat on the trailer now so I can move it around to work on it.  She's awfully high though.

Time to party!
Dave & Dana

John

Penny & Glenda

The conquering heroes

Ron

Thea & Penny

Thora, Grace, and Penny
The party went great (I thought so anyway).  Sorry we didn't get pictures of everybody.  And thanks once again for all your help.  I hope to get the boat on the water by late September or early October--everyone is invited to the christening--I'll let you know when.

Sunday, August 2, 2015

Painting the Hull, Part 2

The entire hull bottom and sides have had several coats of paint applied and waterline is painted in:


I plan to add one more coat to the blue side panels, but that can wait until after the boat is flipped back over.

You can also see a small blue patch up on the side of the keel.  I have installed the centerboard and pivot, and each end of the pivot is held in with a plug made of thickened epoxy.  The blue patch is masking tape used to keep the thickened epoxy off the paint.  After puttying in the plugs on each side, another piece of tape was added to hold the plugs in place while they cure.

I used a laser level to draw the waterline, and as it approaches the stern on the bottom of the hull the line becomes wider.  It's a little hard to see that in this photo--I should have shot it from a higher angle.  Anyway, I saw pictures on the web showing that other builders painted the widening area, so I did the same. 

After I shot the pictures I installed the bow eye, and I have painted the cabin ceiling--easier to do while the boat is upside down.  As I said, the centerboard is installed, so the boat is about ready to flip back over.  I'll wait a week to let the paint harden some more--I'm planning to flip it next Saturday evening, so I'll be sending out flyers soon for the re-flippin' party.  I still have some areas to rub out smoother on the hull bottom, and then I'm going to wax the bottom up to the chines (sharp bend where the hull bottom meets the side panels).  But I'll have plenty of time to do all that this week.

Sunday, July 26, 2015

Painting the Hull, Part 1

Painting the hull bottom and side panels is quite an arduous chore, with many noxious fumes, but at least I am a "trailer sailor" so I don't have to apply anti-fouling paint to the bottom.
Bottom Primer Coat
In the above picture, the primer has been applied to the hull bottom.  That coat will be sanded and two more primer coats applied.

Side Panels Painted, Water Line Masked
 A few steps later, the first two coats of paint have been applied to the side panels.  You can also see that the bottom primer has been sanded, in some places back down to the epoxy.  That is because I am using a "high-build" primer to fill in any low spots or pinholes.  The primer has been sanded completely off the high spots.   You can also see a line of yellow masking tape at the water line.  After the bottom is painted, that tape will be removed and the water line painted the same blue as the side panels.

Hull Bottom, First Coat
 I have masked the side panels with fine-line tape and "tape and drape" and painted the first coat on the bottom.  This paint cannot be sprayed unless you have a special ventilation system.  I used the "roll and tip" method, i.e., the paint is rolled on, followed by the tip of a paint brush to "tip off" any bubbles and roller texture marks.

Hull Bottom and Side Panels
All three coats of the bottom paint are on, and the masking on the water line and side panels has been removed.  You may be able to see some marks in the blue paint that were caused by the draping plastic.  That is not a problem though because I am planning to add a third coat.  I have to wait a couple weeks for the bottom paint to cure before I put any masking tape on it though.  At that time I will also mask off the water line and paint it at the same time as the side panels.  I decided not to exactly copy the prototype model and used a lighter blue paint.  I think the dark blue would look better though now that I have painted it.  When it comes time to repaint I will probably use the darker blue.

Hull Bottom Closer
This is a closer shot of the bottom after the roll and tip painting.  It looks really good here, but of course this is only a photograph and there are imperfections, many of which I will be able to rub out.  It won't look as good as a sprayed finish, but I am not going to be embarrassed by it at all.  You can also see the "unmasked" water line better in this shot.  I will paint the water line with a brush, but I may spray the side panels.  (A different type of paint which is OK for amateurs to spray is used on the side panels.)

Thursday, July 9, 2015

Fiberglassing Hull Bottom and Side Panels, Installing Rubstrips

I started fiberglassing the hull bottom at 1 a.m. so it would be as cool as possible in the garage.  Didn't finish the first coat of epoxy until around 5:30, by which time I was totally exhausted.

It is best to epoxy the hull bottom and side panels all during the same session to get the best chemical bonding between the bottom and side panels.  The bottom is covered with two sheets of fiberglass cloth that overlap in the middle of the hull and over the keel.  I laid both these two sheets in place (sorry, no pictures), then laid the overlapping sheet back so I could epoxy the first sheet in place.  After applying epoxy to the first sheet, I then tried to lay the overlapping sheet back over it, but had great difficulty getting it laid out properly because the lower sheet was very sticky.  I worked on this a very long time and got it the best I could, but I still had some ripples which will have to be sanded off and patched after the epoxy cures.  At that point I decided it would be impossible to add the side panels and get them aligned properly without help.  I wasn't going to go looking for help at 5:30 a.m., so decided to wait and do the side panels after the bottom was cured and sanded.

Below is the bottom epoxied, and sanded where the side panels will be glued.  I have taped the over 15'-long side panels in place with an approximately 6" overlap.  After I have enough epoxy on the side panels I can then cut the overlap to 3" and remove the taped section.  (Trying to remove the tape from the fiberglass cloth itself would be a huge mess and probably mis-align the cloth.)
Hull Bottom Epoxied, Side Panels Fiberglass Taped in Place
Here the side panels have been epoxied in place.  I still ended up with a few ripples, which, again, will have to be sanded out and patched.
Hull Bottom and Side Panels Epoxied
Side Panels and Bottom Sanded, Rubstrips Started
In the above shot you can see that the entire bottom and side panels have had their initial sanding.  I am also adding rubstrips to the bow and keel noseblock, the two areas most likely to run into underwater debris.  At this point I have glued on two layers of dynel cloth with epoxy.

The next step is to add a layer of epoxy thickened with graphite. The graphite will make the surface extra strong and slippery.  That, along with the dynel cloth should do a very good job of protecting those two areas.  In the below shots, I have added the next layer of epoxy mixed with graphite.

Bow Rubstrup with Graphite/Epoxy Layer

Noseblock Rubstrip with Graphite/Epoxy Layer
I will do quite a bit of sanding and smoothing on the rubstrips.  I don't want to sand into the cloth, though, so any deep indentations will be filled later with fairing compound.

Thursday, June 25, 2015

Quick Update

Not too much happening right now because it is too hot to do any epoxy or painting work.  I have cut the cloth for the bottom and side panels and for the transom.  The two halves of the bottom cloth have been laid on and trimmed as you can see here:

Hull Bottom Fiberglass Cloth, Port Side
I have laid the cloth on the port and starboard sides, but when I add the epoxy I will have to temporarily lay the part that covers the keel back on the port side--cloth on both port and starboard sides overlap the keel.  I was unable to get good coverage of the bow stem, as you can see, so I will cut a 4" wide piece of fiberglass cloth to go over it.  I have some pre-made fiberglass "tape" of that width, but the edges are selvedged and pretty thick, so hard to smooth down and feather.  By cutting my own, I am able to pull several lengthwise threads off the edges, leaving threads in only one direction  at the edges, which will be much easier to feather out.

I would very much like to put the cloth for the side panels on now and trim them, but I tried holding them in place with weights and they slid right off.  It's going to be very difficult to get the panels overlapped and aligned properly on the still uncured bottom panels, but that's what I am going to have to do (others have managed, so I guess I can too).  I could wait and add the side panels after the bottom panels are cured and sanded, but the bond is not nearly as good that way and this is a place where a good bond is important.

As I said it is too hot to do any of this now.  We are supposed to have a fairly good cool-down on Saturday, so if that holds I plan to start the epoxy work at about 3 o'clock Saturday morning.  That should enable me to get at least two coats on before it heats up too much--may be able to do three coats.  It is imperative to get the second coat on while the first coat is still tacky, otherwise it would have to be sanded first and that can damage the cloth.  If I can get a third coat on, all the better.  After all that, I'll have to wait for the next cool spell to start painting.  According the weather guy in Oklahoma City, we are supposed to have several cooler cycles this summer.  I hope he's right!

In the meantime, I have started work on the electrics panel:

This panel will be hinged over an opening in the bulkhead forward of the cabin.  Four of the eight switches on the upper right are for electronics and four for lighting.  There are two 12V DC outlets and a voltmeter under the switches.  (I decided to mount the main power switch in the bulkhead near the battery, instead of in the panel.)  The white rectangle on the upper left is an AM/FM radio with USB input for MP3s.  Below that is a VHF radio.  I don't really need it on inland lakes, except to listen to the weather reports, but I may get a chance to sail on Lake Michigan later, where it could be a necessity.  Besides, it looks cool!

Sunday, June 14, 2015

A "Flippin' Pizza Party"

With the help of dear friends and neighbors the boat is upside-down now and ready for 'glassing the hull, installing the centerboard, mucho sanding, and painting, along with a few other chores. Here's how we did it:
Trying to get organized!
The rollover begins . . .

and continues . . .

halfway there!

A couple sawhorses hold the boat in place
while we decide what to do next.

I guess we figured it out and she's on her way down . . .

a little farther (further?) . . .

almost there . . .

and she's down!

Next step is to move the boat to the center of the garage.

And that's it--time to party!

Most everybody stayed for pizza, beer, and soft drinks afterwards--pretty sure everyone had a good time. OK, maybe folks don't look too happy in these pics, but that's the photographer's (my) fault.  :-) Thanks to Thea Pratt for shooting the flipping pictures, and to Rose Van Orden for bringing a wonderful Greek salad. 

Tuesday, June 2, 2015

Odds & Ends: Getting Ready to Flip the Boat

Several small jobs are called for before flipping the boat over to finish the hull.  One is to cut the lazarette holes, which I had already done and then test fit the Bowmar hatches.  The hatches fit just fine, as shown here: 
Lazarette Hatches Test Fit
 (You can also see the hole I cut for the tiller, which I will discuss later.)

Portholes

Next I cut out the portholes for the little cabin (or cuddy as they call it).
Porthole Flanges


Porthole flanges are glued in next as shown here.  Later Lexan windows will be placed over the flanges.
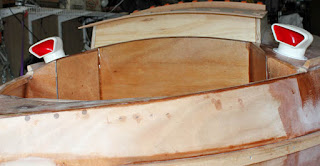


Cowl Vent Test Fit

Cowl Vent Over Dorade Box

The next thing I did was to cut the holes for the cowl vents on top of the dorade boxes.  Here are the vents sitting on the dorade boxes.  The vents will not be permanently installed until much later.


The dorade boxes will have small drain holes in the hull, so any water that finds it's way into the cowl vent will drain out over the side instead of into the cabin.


Tiller Hole

Test Fit of Rudder and Tiller

There needs to be a hole in the transom for the tiller to pass through.  Here is the hole cut and rounded over with a router.


This shows a test fit of the tiller from outside the back of the boat.  The rudder is sitting on a stack of shim boards to get it to the correct height it will be when it is permanently installed.
Struggle with Rub Rail Strip #2 on Starboard Side
One of the jobs that is called for before flipping the boat is to install the rub rails.  The rub rails are made up of three, 3/4" thick strips on each side, for a total width of 2 1/4".  I was able to install the first strip on each side without much trouble, but the second strip on the starboard side did not want to cooperate at the bow end, where there is the greatest amount of curve.  My good friend and neighbor, Dave Hardy, walked up at just the right time and offered his help.  He had the very good idea of using tie-down straps to pull the strip over into place.  Two straps are hooked together and reach all the way to the back of the boat, across the transom, and hook on to the same strip extending out the back.  This worked extremely well and it was a very good thing Dave showed up when he did, before the glue started to cure.  Many thanks to him, and by the way this is not the first time he has "saved my bacon" with problem-solving ideas on this project.

I plan to use this same technique for the remaining rub-rail strips.

The manual also calls for a large, square hole to be cut in the stem, just above the rub rails.  The hole will be for the bowsprit to pass through.  I may cut the hole before flipping the boat or afterwards, it doesn't really matter.