
 | |
| Gluing Keelson and Epoxy on Floor Joists |
In the background you can see the "keelson" being glued together. It is also longer than 8 feet. The keelson (keel's son) will be glued to the top of the keel over the lead pours and hollow area.
 |
| Gluing Hull Panels Together |
Plywood only comes in 8-foot lengths, so to get the nearly 16-foot panels I need for the hull I have to glue two pieces together end-to-end. Because I bought the kit, "finger joints" are provided for that purpose. This is a good way to get a really secure joint and helps keep the panels aligned.
 |
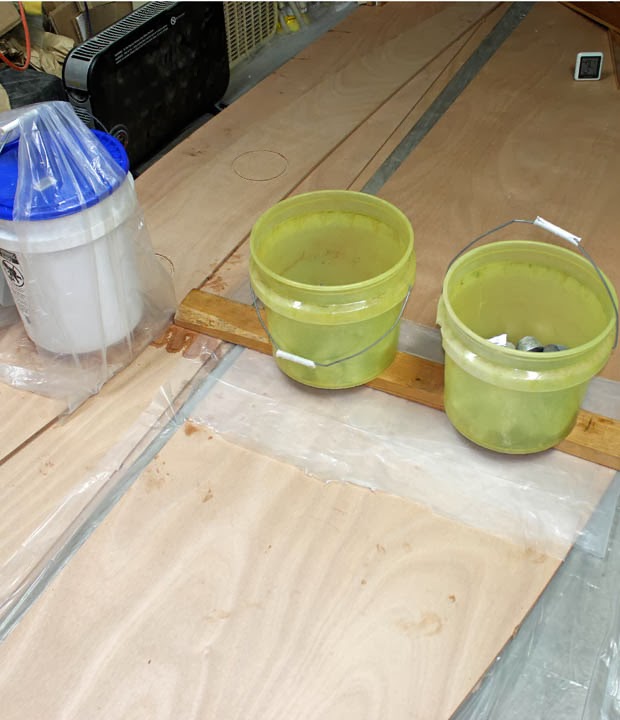
| Finger Joints |
Below that is a picture of the finger joints. I couldn't take a picture of them while the joints are gluing under weights. There is 100 pounds of lead in those buckets on top of the joint. You might recognize the ingots I poured earlier. I shot the picture of the finger joints after I glued some more hull panels together, so you only see a few of the fingers. Anyway, you can get a pretty good idea of the concept. The Skerry featured "puzzle joints." That is they were shaped similarly to jigsaw puzzles, with larger round, interlocking areas at the ends of the fingers. This really helped keep things aligned properly. I don't know why they didn't use them on this boat--a later design. There is a big puzzle joint on the keelson.
 |
| Gluing Bottom Panels and Top Panels |
I didn't start work on the bottom panels before now because they are too wide for my makeshift shop table. I spent most of yesterday clearing everything out of the way and dismantling the table (two sawhorses and a narrow sheet of plywood). Now I'm gluing more of the hull panels on the garage floor. The yellow buckets contain 50 lb. of lead each and are weighing down the bottom panel joints. The weights are there to make sure the "fingers" all lay flat. To the left you can see the top panels being glued. I didn't have any more lead, so the white bucket is full of water. It only weighs about 30 lb., but that should be enough. The top panels are sitting on top of the middle hull panels I glued previously, and just to the right of the white bucket you can see the finger joints I took the above closer picture of.
 |
| Hull Panels |
This is a slightly wider shot of the six hull panels. Each pair is glued simultaneously, one on top of the other, with a sheet of plastic between. The epoxy glue won't stick to the plastic. I couldn't get a very good shot of the entire length of the panels, but you get the idea. As I said, they are almost 16 feet long.
You can barely see two circles on the top hull panel--one is partially obscured by the white bucket. That's where the two portholes on each side of the boat will go.
Today's high is 21, so I didn't want to do any epoxy work that requires the garage to be heated above about 45 or 50 degrees. It's OK to do gluing at 45 or above, but not clear-coating. The temp should be at least 55 for that. I got some sanding done on the two Skerry parts (daggerboard and rudder section), and finished sanding the PocketShip's centerboard. The centerboard is very smooth and should glide smoothly in the water and in and out of its trunk.
Pretty soon I need to start thinking about a name for the boat. Jan thought of the name "Freedom" for the Skerry. Any ideas for the PocketShip? Think about it and let me know if you come up with something. So far I am drawing a blank.
No comments:
Post a Comment