Sunday, April 26, 2015

A Fun Project

I have been looking forward to finishing the installation of expanding polyurethane foam in the seatbacks, a project I started earlier but didn't have enough foam to finish.
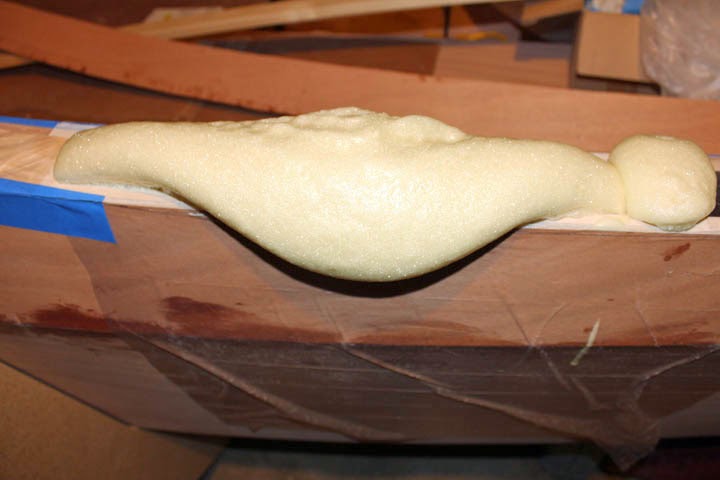
Seatback Foam Overflow
More of the two-part foam came yesterday and here's a shot of some of the cured foam that overflowed.  I wanted some overflow to make sure the compartments were completely filled, but this is a bit much.  I could have had less by doing a lot of tiny pours, but I didn't want to do a lot of tiny pours!  I'm not that patient, and I think it would have been harder to get the foam in all the nooks and crannies doing it that way.

Seatback Foam Trimmed
After the foam cured I was able to trim it very easily with a saw, then sand it down for a nice fit.  As I say, it was one of the more fun projects, for me anyway.

Wider Shot of Floatation Foam in Port Seatback
The manual calls for cutting up bits of foam panels and cramming them in the seatbacks, the same as in the bow compartment and under the cockpit, but I felt doing it this way in the seatbacks made sense.  Some builders have used expanding foam in the bow compartment also but I decided against it because if water gets in there I think it would be a lot harder to get out.  The seatbacks are completely sealed and no water should ever get in them unless a hole is punched in the side, and if that ever happens I will probably have much bigger problems to contend with.  (The bow compartment is sealed pretty well also, but I suppose the bow eye could eventually leak.)

Monday, April 20, 2015

Floatation Foam, Dorade Boxes, Cabin Deck

I have decided to put pourable, expanding foam in the seatbacks to help fill every void.  The seatback spaces are well sealed, so the only time the floatation foam will be needed is if the hull is punctured in that area along with swamping of the boat, something I hope will never happen.  Here is the result of a pour of 20 oz. of foam in one of the backs.
I have had to stop at this point because I have to order more foam.  Will go on to other things and come back to the seatbacks later.

The dorade boxes are finished (except for the tops) and I think a picture will make it easier to explain their purpose:
Here's the portside dorade box waiting for it's top (which is part of the cabin deck as you will see later).  There is a vent hole opening into the cabin, and after the top is installed a hole for the horn vent will be drilled in it.  A small drain hole will be drilled in the hull down near the bottom of the box.  That way any water that gets in through the horn vent will drain out the side instead of getting into the cabin.

On to the cabin deck.

While I was doing the other jobs mentioned above I spread three coats of epoxy on the underside of the cabin roof (deck) so it would have time to cure.

The deck has been installed over the top of the cabin and you can see in the lower right corner of the photo the part of the deck that covers the dorade box.  I realize now that it would have been much easier to drill the drain hole before the deck was installed--this was not mentioned in the instructions.  I can still do it, but it will be much harder now.  Temporary screws to hold the deck while the glue cures are backed up by small pads to minimize damage to the deck.  Even though it is the cabin roof it is also a deck because you walk on it to get to the front anchor well.
This wider shot gives a bit better idea of how the boat will look when finished. As you can see there are dorade boxes on each side. 

The front well where the anchor will be stored will also have drain holes.  


Saturday, April 11, 2015

Starting to See a Tiny Bit of "Light at the End of the Tunnel"


Cabin (Cuddy) Carlins & Cleats


Here you can see the cabin carlins (roof supports across the top) and side cleats as the glue is curing.  Later the carlins will be trimmed flush with bulkhead 1 (at the bottom of the picture).  The view is from the bow end.
.
Outboard Cleats from Bulkhead 2 to Bow, Carlins
Here is another view from behind bulkhead 2, looking toward the bow.  You can also see cleats being glued in the front "anchor well" at the bow end.

New Upper Breasthook
I had to build a new breasthook because the one supplied in the kit was too narrow.  Things look pretty messy because I tried to make the original breasthook fit and when I finally decided to remove it the glue had already cured, so it ripped out some of the port cleat.  I had to fill in the gap with thickened epoxy (thickened with wood flour).

Upper Breasthook
Here's the upper breasthook after sanding.  I got a bit overzealous trying to smooth out the filled area and sanded through the top layer of plywood.  No worries, though, the new breasthook is made of two pieces of plywood laminated together and is a bit thicker than the original. 

Starboard Outboard Stringer
This shows the outboard stringer being glued.  The inboard stringer and lower stringer are already in place.  Screws holding the lower stringer for gluing will be removed later.  The seatback will be glued to the stringers and frames after a vertical stringer has been added at the front end and some other work is done.  The top stringers will support the top of the seat, which in nautical terms is referred to as the "deck"in this case. 

 You can also see the stub end of the electrical conduit coming from the front storage and battery compartment to the stern.  There is another on the port side.  I decided to cut a section of the conduit out in the lowest bilge.  That way any water that finds its way into the conduit will drain into the bilge and can be easily removed.

Floatation foam will go in the forward seatback sections.  I did not cut rigid foam to put in there because there would be plenty of voids.  If water ever gets in I probably won't know anything about it unless I hear it sloshing around, and there would be no way to get it out short of drilling holes.  So I am planning to fill the areas with expanding foam, that if done properly will completely fill the seatbacks, leaving no place for water infiltration.

Port Seatback Curing
Starboard Setback Curing
Seatbacks are glued in and shown curing here.  The lower stringer and frame attachments could not be clamped, so instead I secured them with brads using a nail gun.  The tiny brads will remain, forever entombed in epoxy.  You can also see blue conduit in the rear storage "locker" on the port side. That will be used to route the VHF antenna cable to the antenna which will be mounted at the stern.  I also ran identical conduit on the starboard side to accommodate any electrical needs I have not anticipated.

With the seatbacks in place, my next steps include building the dorade boxes,* cabin deck, and companionway hatch, followed by installation of the seatback "decks" and fiberglassing the cockpit interior.  Then it's on to flipping the boat over and finishing the hull!

*A dorade box is a box with a horn vent mounted on top and a vent opening into the cabin.  The cabin vent is placed an inch or so above the bottom of the dorade box, so that any water that gets in via the horn vent will flow out through a hole in the hull before it gets high enough to reach the cabin vent.  This will become much clearer with pictures, I'm sure.