Thursday, June 25, 2015

Quick Update

Not too much happening right now because it is too hot to do any epoxy or painting work.  I have cut the cloth for the bottom and side panels and for the transom.  The two halves of the bottom cloth have been laid on and trimmed as you can see here:

Hull Bottom Fiberglass Cloth, Port Side
I have laid the cloth on the port and starboard sides, but when I add the epoxy I will have to temporarily lay the part that covers the keel back on the port side--cloth on both port and starboard sides overlap the keel.  I was unable to get good coverage of the bow stem, as you can see, so I will cut a 4" wide piece of fiberglass cloth to go over it.  I have some pre-made fiberglass "tape" of that width, but the edges are selvedged and pretty thick, so hard to smooth down and feather.  By cutting my own, I am able to pull several lengthwise threads off the edges, leaving threads in only one direction  at the edges, which will be much easier to feather out.

I would very much like to put the cloth for the side panels on now and trim them, but I tried holding them in place with weights and they slid right off.  It's going to be very difficult to get the panels overlapped and aligned properly on the still uncured bottom panels, but that's what I am going to have to do (others have managed, so I guess I can too).  I could wait and add the side panels after the bottom panels are cured and sanded, but the bond is not nearly as good that way and this is a place where a good bond is important.

As I said it is too hot to do any of this now.  We are supposed to have a fairly good cool-down on Saturday, so if that holds I plan to start the epoxy work at about 3 o'clock Saturday morning.  That should enable me to get at least two coats on before it heats up too much--may be able to do three coats.  It is imperative to get the second coat on while the first coat is still tacky, otherwise it would have to be sanded first and that can damage the cloth.  If I can get a third coat on, all the better.  After all that, I'll have to wait for the next cool spell to start painting.  According the weather guy in Oklahoma City, we are supposed to have several cooler cycles this summer.  I hope he's right!

In the meantime, I have started work on the electrics panel:

This panel will be hinged over an opening in the bulkhead forward of the cabin.  Four of the eight switches on the upper right are for electronics and four for lighting.  There are two 12V DC outlets and a voltmeter under the switches.  (I decided to mount the main power switch in the bulkhead near the battery, instead of in the panel.)  The white rectangle on the upper left is an AM/FM radio with USB input for MP3s.  Below that is a VHF radio.  I don't really need it on inland lakes, except to listen to the weather reports, but I may get a chance to sail on Lake Michigan later, where it could be a necessity.  Besides, it looks cool!
Sunday, June 14, 2015

A "Flippin' Pizza Party"

With the help of dear friends and neighbors the boat is upside-down now and ready for 'glassing the hull, installing the centerboard, mucho sanding, and painting, along with a few other chores. Here's how we did it:
Trying to get organized!
The rollover begins . . .

and continues . . .

halfway there!

A couple sawhorses hold the boat in place
while we decide what to do next.

I guess we figured it out and she's on her way down . . .

a little farther (further?) . . .

almost there . . .

and she's down!

Next step is to move the boat to the center of the garage.

And that's it--time to party!

Most everybody stayed for pizza, beer, and soft drinks afterwards--pretty sure everyone had a good time. OK, maybe folks don't look too happy in these pics, but that's the photographer's (my) fault.  :-) Thanks to Thea Pratt for shooting the flipping pictures, and to Rose Van Orden for bringing a wonderful Greek salad. 

Tuesday, June 2, 2015

Odds & Ends: Getting Ready to Flip the Boat

Several small jobs are called for before flipping the boat over to finish the hull.  One is to cut the lazarette holes, which I had already done and then test fit the Bowmar hatches.  The hatches fit just fine, as shown here: 
Lazarette Hatches Test Fit
 (You can also see the hole I cut for the tiller, which I will discuss later.)

Portholes

Next I cut out the portholes for the little cabin (or cuddy as they call it).
Porthole Flanges


Porthole flanges are glued in next as shown here.  Later Lexan windows will be placed over the flanges.


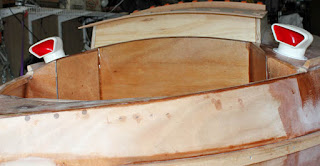
Cowl Vent Test Fit

Cowl Vent Over Dorade Box

The next thing I did was to cut the holes for the cowl vents on top of the dorade boxes.  Here are the vents sitting on the dorade boxes.  The vents will not be permanently installed until much later.


The dorade boxes will have small drain holes in the hull, so any water that finds it's way into the cowl vent will drain out over the side instead of into the cabin.


Tiller Hole

Test Fit of Rudder and Tiller

There needs to be a hole in the transom for the tiller to pass through.  Here is the hole cut and rounded over with a router.


This shows a test fit of the tiller from outside the back of the boat.  The rudder is sitting on a stack of shim boards to get it to the correct height it will be when it is permanently installed.
Struggle with Rub Rail Strip #2 on Starboard Side
One of the jobs that is called for before flipping the boat is to install the rub rails.  The rub rails are made up of three, 3/4" thick strips on each side, for a total width of 2 1/4".  I was able to install the first strip on each side without much trouble, but the second strip on the starboard side did not want to cooperate at the bow end, where there is the greatest amount of curve.  My good friend and neighbor, Dave Hardy, walked up at just the right time and offered his help.  He had the very good idea of using tie-down straps to pull the strip over into place.  Two straps are hooked together and reach all the way to the back of the boat, across the transom, and hook on to the same strip extending out the back.  This worked extremely well and it was a very good thing Dave showed up when he did, before the glue started to cure.  Many thanks to him, and by the way this is not the first time he has "saved my bacon" with problem-solving ideas on this project.

I plan to use this same technique for the remaining rub-rail strips.

The manual also calls for a large, square hole to be cut in the stem, just above the rub rails.  The hole will be for the bowsprit to pass through.  I may cut the hole before flipping the boat or afterwards, it doesn't really matter.