Saturday, August 29, 2015

About the Electrical Design for this Boat

One of the readers suggested I explain the electrical system I designed for my boat.  I think that's a good idea, partly because someone with more experience with marine electrics might have some suggestions.  So here goes.

Here is the way I plan to lay out all the electrics and electronics on the boat (this may change as I do the actual work):


Obviously, the various components are only in their approximate locations.

I drew a detailed schematic drawing before purchasing the components.  Again, this drawing may have to be changed when I start actually installing things:


There is a switch to isolate the solar panel which, depending upon the voltage regulator (V.R.) I choose, may not be necessary.  I also may decide against a trolling motor, in which case the trolling motor outlet will be removed.

Friday, August 28, 2015

Topsides and Cockpit Painting Started

I finally finished sanding the remaining sections for painting.  Looks like I forgot to take pictures of that.

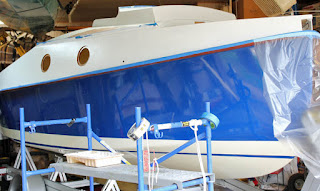
I painted the so-called primer coat today. The topsides panels, companionway hood, and inside the cockpit have all got a coat of white primer and will be finished an off-white that closely matches the hull bottom.
I say "so-called" because most of the primer will be sanded back off.  That is, it is not really a primer in the old sense that it helps the paint adhere to the boat's surface.  Instead, it is thickened to fill in the low areas.  After most of it is sanded off, only the low areas are left painted, leaving a much smoother surface.  All but the worst flaws are hidden. The rub rails, toe rails and a couple other mahogany pieces are masked off and will be varnished after the painting is finished and has cured sufficiently.

I'll be adding at least three coats of paint to the topsides panels and inside the cockpit.  One more coat of blue will be added to the side panels. As you may remember, the inside of the cabin is painted with a good quality exterior house paint.  I have a bit more filling, sanding, and painting to do in there, but I may hold off and do that this winter so I can go ahead and launch the boat before it is too cold--the cabin can wait.

After the topsides and so on are painted I have to finish sanding and painting the companionway slide.  It also has a mahogany strip that will be varnished.

Then, after all that is done I have to apply three coats of epoxy to the mast, spars, and tabernacle to protect them from the elements (the boom gallows and tiller have already been epoxied).  Then they will all be varnished to protect them from UV rays!  The rudder has been epoxied and painted to match the boat, but I still have to install it.

Then I can finally start on the "fitting out" which includes installing the port lights and all the blocks (pulleys), rigging, stays, sail tracks, electrics, etc., etc.  I'm still hoping to launch sometime in October, but it's going to be tough.

Monday, August 17, 2015

Some Progress

I have not accomplished a lot since up-righting the boat besides sanding--the manual states (tongue-in-cheek) that there is about 6,000 hours more sanding to do.  It does seem like that much at times.

I installed the companionway hood , shown here:
Companionway Hood
 At this point I only have about half the hood top sanded, so it looks a little strange.

Fillet Around Hood
I have also added a small fillet around the outside of the hood.  Rather than try to reach in and fillet the inside, I'll brush some epoxy in the interface to keep water from leaking in under the edge of the hood, although I don't think it would do any damage if it did because all the wood surfaces are sealed with epoxy already. 

Hood Drain
In this closer shot you can see the hole I made in the hood to allow rainwater to drain.  (*The drain hole is not mentioned until much later in the manual--more about that later.)  As you can also see, I sawed out a slot below the drilled hole so water can drain right down to the bottom.

Electric/Electronic Panel
I also took this time to install the electrical control panel, although I will have to remove or mask it when I do some more painting in the cabin.  Included on the panel are an entertainment radio with USB input, a VHF receiver/transmitter, switches for electronics and lights, two 12V outlets, and a voltmeter.
Open Panel
I mounted the panel on a piano hinge for easy access to the back.  The only problem was there is limited space for the panel so I could not figure out a way to mount the entertainment radio that would allow me to easily open and close the panel.  The solution was to put it at the top because it is fairly easy to slide it out of it's mounting box. (The black metal box above the VHF.)  So the radio will have to come out when I want to open the panel--a bit of a problem but not too bad.

*There are numerous drain holes and other holes that must be drilled in the hull.  The instruction manual, while very well written for a first edition does not mention these holes until after the boat has been painted and is close to being finished.  CLC is working on many corrections to the manual that will be in later editions, so I hope they will move the mention of the holes to match the context.  I wish I had discovered this earlier and made notes because in most cases it would have made for easier or better construction.  For example making the hood drains extend to the bottom as shown above.  There are drain scuppers and holes in several spots that I think would have worked better if they had been there before the fillets were added.  I also wished that I had drilled the drains for the dorade boxes before they were installed.  I had to do some very careful measuring and drill from the outside.  Amazingly, I got the hole almost exactly right on the starboard side.  On the port side, I misjudged a bit and drilled into the bulkhead.  I got it right on the second try, and of course the incorrect hole was easily filled with thickened epoxy.  A big problem, which I have not started on, is that there need to be two holes drilled in the tops of the seatbacks for the gallows poles.  These holes have to be in exactly the right spot of course, but a bigger problem is that flanges are to be installed inside the storage lockers for the bottoms of the poles.  That would have been much, much easier to do before the sides of the seats were installed, with less chance of leaving bare wood exposed to the elements.
Sunday, August 9, 2015

Back On Her Feet and Onto the Trailer

We turned the boat back over and held the Unflippin' Party yesterday evening (August 8).  This job turned out to be much harder than expected, compared to turning it over the other way.  Here are some photos that tell the story:
That thing looks heavy.  Can we do this?

Maybe we can roll it over here--the driveway's pretty steep though.

Well, maybe this wasn't such a good idea after all.

Back down she goes.

On the way out to the street where it's level and there's more room to maneuver.
Set her down easy.

Half-way over.

And she's almost upright at last.

Keel is on the trailer!

Just about there.

And she's on--huge sigh of relief!

Back in the garage.
I decided to put the boat on the trailer now so I can move it around to work on it.  She's awfully high though.

Time to party!
Dave & Dana

John

Penny & Glenda

The conquering heroes

Ron

Thea & Penny

Thora, Grace, and Penny
The party went great (I thought so anyway).  Sorry we didn't get pictures of everybody.  And thanks once again for all your help.  I hope to get the boat on the water by late September or early October--everyone is invited to the christening--I'll let you know when.

Sunday, August 2, 2015

Painting the Hull, Part 2

The entire hull bottom and sides have had several coats of paint applied and waterline is painted in:


I plan to add one more coat to the blue side panels, but that can wait until after the boat is flipped back over.

You can also see a small blue patch up on the side of the keel.  I have installed the centerboard and pivot, and each end of the pivot is held in with a plug made of thickened epoxy.  The blue patch is masking tape used to keep the thickened epoxy off the paint.  After puttying in the plugs on each side, another piece of tape was added to hold the plugs in place while they cure.

I used a laser level to draw the waterline, and as it approaches the stern on the bottom of the hull the line becomes wider.  It's a little hard to see that in this photo--I should have shot it from a higher angle.  Anyway, I saw pictures on the web showing that other builders painted the widening area, so I did the same. 

After I shot the pictures I installed the bow eye, and I have painted the cabin ceiling--easier to do while the boat is upside down.  As I said, the centerboard is installed, so the boat is about ready to flip back over.  I'll wait a week to let the paint harden some more--I'm planning to flip it next Saturday evening, so I'll be sending out flyers soon for the re-flippin' party.  I still have some areas to rub out smoother on the hull bottom, and then I'm going to wax the bottom up to the chines (sharp bend where the hull bottom meets the side panels).  But I'll have plenty of time to do all that this week.